First let me say if this was a very special quilt that needed to be perfectly square, I would not use this method. However for daily use quilts, throws and baby quilts it is a huge time saver.
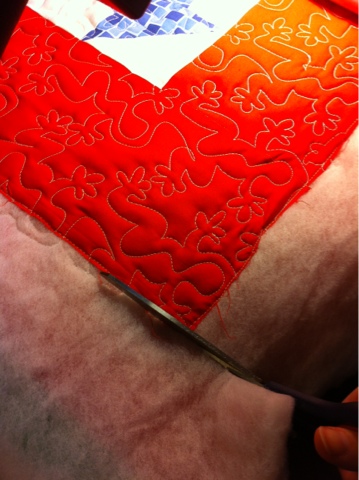
After I finish quilting, I roll the quilt back so I can see the bottom edged. With my good scissors, I just start trimming along the bottom edge. (Make sure your leaders are out of the way.)
Next, I pull the quilt over the belly bar, just a little at a time, to give me access to the sides. Trim up each side as space allows.
As you are trimming, you may notice areas where the top pulled one way or the other. You will just trim straight like you would with your rotary cutter.
Continue trimming both sides until you reach the top of the quilt. Now finish trimming along the upper edge by the take up roller and your all done!
Saturday, February 9, 2013
Ribbit Pantograph Design by Patricia Ritter
This design is something I wanted to do for a long time but didn't think I was ready for all the curves. Finally decide to give it a try and am so glad I did. It was very time consuming but in the end, well worth it. What do you think?
Friday, February 1, 2013
Pantographs From The Front of Your Machine
Just wanted to share some pictures of how I do pantographs on my Hinterberg frame from the front. My quilting room is extremely small so my quilting system is as far back to the wall as I can possibly get it. Moving the machine out each time I want to do a pantograph isn't an option. So, with lots of research and advice from several sources, this is what I came up with.... hey, it is also VERY inexpensive.
First I purchased some foam board that is available at most retail stores and craft stores. You will also need some binder clips in small and medium.
I love the quilt just like I always do with the except of leaving the lower belly bar in the up position. (This is the bar that the quilt top attaches to.)
Now it's time to line up my pantograph with my quilt top to get started. I just use a ruler and measure from the each of the quilt top, making sure I have enough space to finish my design.
First I purchased some foam board that is available at most retail stores and craft stores. You will also need some binder clips in small and medium.
I love the quilt just like I always do with the except of leaving the lower belly bar in the up position. (This is the bar that the quilt top attaches to.)
I cut the form board in half so they are 10" wide each. Using two of the medium binder, I attached the form boards together to make a long piece. I am assemblying this on the frame so I have the quilt top for support.
I then lay my pantograph on top and attache the pantograph to the form boards using small binder clips. I typically allign the each of my paper with the edge of the boards for simplicity.
Now it's time to line up my pantograph with my quilt top to get started. I just use a ruler and measure from the each of the quilt top, making sure I have enough space to finish my design.
With my laser mounted to the front of the machine. I am ready to quilt with my pantograph and make a beautiful design.
Just a note... before I got my current laser light holder, I just taped a laser light to a large binder clip and attached the binder clip to my handles on the front side.
One of the great advantages to this method (other than how inexpensive it is) is that when I am not using it, it is very easy to disassemble and store. Others have talked about purchasing a long shelf from Lowes or Home Depot and place that in the same method on the belly bars.
Hope this helps someone. Just give it a try and modifiy to something that works for you.
Rhonda
Wednesday, January 23, 2013
1 Little, 2 Little, 3 Little Quilters
Just wanted to share one of the projects I am currently working on. I few friends from work and I have been working on these during our lunch break.
I believe we bought the pattern from Keepsake not not positive.
Hope you enjoy! P.S. the one with the big hair and upside down block is me.
I believe we bought the pattern from Keepsake not not positive.
Hope you enjoy! P.S. the one with the big hair and upside down block is me.
Sunday, January 13, 2013
Practice, practice and more practice
When I first bought my longarm machine, everyone said practice, practice and more practice. We all know that's true in everything we do but the attached pictures are proof.
One of my quilting groups all made double wedding ring quilts. I had the honor of quilting three of the five and two of which were feathers. That is 112 blocks of feathers. I have already posted pictures of mine (the pastel, beachy colors) but I am gonna post a few again so you can see the difference.
Hope you enjoy and remember, in anything we do, practice is the key.
One of my quilting groups all made double wedding ring quilts. I had the honor of quilting three of the five and two of which were feathers. That is 112 blocks of feathers. I have already posted pictures of mine (the pastel, beachy colors) but I am gonna post a few again so you can see the difference.
Hope you enjoy and remember, in anything we do, practice is the key.
Tuesday, December 18, 2012
Candle Wicking Quilt
First let me say what a pleasure it was to be able to quilt this top! When contacted I had no idea why candlewicking was or how on earth I would go about quilting it.
After doing a little google research I was satisfied that I could do a good job for my customer and I accepted.
Hope you enjoy... I think this is one of the most beautiful quilts I have ever seen.
After doing a little google research I was satisfied that I could do a good job for my customer and I accepted.
Hope you enjoy... I think this is one of the most beautiful quilts I have ever seen.
Christmas Log Cabin
I just uploaded pictures of the quilt I just finished. I have to tell you
all the story and please try not to laugh to hard. :)
To start off with, I love a good challenge.
- This quilt measures 116" x 124" (maybe even a little larger). My
frame will only do about 100" and that is pushing it. I researched through
the group pages about quilting a large quilt and felt confident that I
could handle this.
- I quickly realized that my quilt was not advancing evenly.. no
problem, I just lined my pantograph up with the previous row and continued.
- Because of the size and not stretching my fabric as I rolled enough, I
had HUGE puckers on the back and when I looked under the bottom, it looked
like my grandpa's sagging britches the back was so uneven. So after
ripping out three 10" rows of stitching, I then crawled up and tighten the
backing using binder clips (yep the kind to hold stacks of paper together).
Worked like a charm, I just had to crawl under to remove them before
advancing and crawl back under and reattach them before quilting again.
- About 2 ft from the bottom on the first half of the quilt, I realized
that I couldn't roll anymore up because I had ran out of room because of
the 1/2" extra space my new dead bar was taking up. :)
- I then decided that I would go ahead and remove the top and start on
the other side only to find I had no way to attach the bottom of the
backing or top to the rails since it was quilted.
- Hmmmm.....
- Off to Harbor Frieght we go to purchase the magnets that hold tools on
the wall... Yes, they really will smash your fingers they are so strong.
This allowed me to float backing, batting and top, line everything up and
secure with magnets. No worries of anything shifting with those babies.
- Now off to quilting again, only this time because the first half was
quilted it was really advancing unevenly. To the point that I couldn't
work with it.
- That's when I decided to quilt as much as I could, unroll and add a
baby quilt and roll back up. Worked great and allow me to finish the
entire quilt.
I learnt so much during the process and am ready to do another large one
quickly so that I can continue to learn more. I wish you could have been a
fly on the wall because I can promise it was one of the most comical
experiences of my quilting career.
Rhonda
all the story and please try not to laugh to hard. :)
To start off with, I love a good challenge.
- This quilt measures 116" x 124" (maybe even a little larger). My
frame will only do about 100" and that is pushing it. I researched through
the group pages about quilting a large quilt and felt confident that I
could handle this.
- I quickly realized that my quilt was not advancing evenly.. no
problem, I just lined my pantograph up with the previous row and continued.
- Because of the size and not stretching my fabric as I rolled enough, I
had HUGE puckers on the back and when I looked under the bottom, it looked
like my grandpa's sagging britches the back was so uneven. So after
ripping out three 10" rows of stitching, I then crawled up and tighten the
backing using binder clips (yep the kind to hold stacks of paper together).
Worked like a charm, I just had to crawl under to remove them before
advancing and crawl back under and reattach them before quilting again.
- About 2 ft from the bottom on the first half of the quilt, I realized
that I couldn't roll anymore up because I had ran out of room because of
the 1/2" extra space my new dead bar was taking up. :)
- I then decided that I would go ahead and remove the top and start on
the other side only to find I had no way to attach the bottom of the
backing or top to the rails since it was quilted.
- Hmmmm.....
- Off to Harbor Frieght we go to purchase the magnets that hold tools on
the wall... Yes, they really will smash your fingers they are so strong.
This allowed me to float backing, batting and top, line everything up and
secure with magnets. No worries of anything shifting with those babies.
- Now off to quilting again, only this time because the first half was
quilted it was really advancing unevenly. To the point that I couldn't
work with it.
- That's when I decided to quilt as much as I could, unroll and add a
baby quilt and roll back up. Worked great and allow me to finish the
entire quilt.
I learnt so much during the process and am ready to do another large one
quickly so that I can continue to learn more. I wish you could have been a
fly on the wall because I can promise it was one of the most comical
experiences of my quilting career.
Rhonda
Subscribe to:
Posts (Atom)


